Kimchi for the Soul

Hey, everyone! This week, I really wanted to highlight one of my all-time favorite foods to make and eat. Since it’s Napa cabbage and Joseon radish season, it’s the perfect time to make some lovely Kimchi! Traditionally in Korea, a great harvest takes place during late fall, when a year’s worth of Kimchi is made. This event, called Kim-Jang, brings together an entire community for making hundreds and hundreds of heads of Kimchi. This is then shared by families and community members. Kimchi is a staple food in Korea, and what better way to use the harvest then to make lots of it! Nowadays, most people make Kimchi for their families and most people’s recipes and ratios differ from household to household.

          One of the reasons why I love Kimchi so much is that it’s incredibly versatile. It can be used as a side dish, a base for soups or stews, stir fried, boiled, and so on. When you get the hang of making Kimchi, you can start to experiment by adding other ingredients that you like that are fit to ferment. In some parts of Korea, you can find thinly sliced carrot in Kimchi as well as a certain type of seaweed. A handful of chefs and culinarians in Korea and around the world have taken it upon themselves to make Kimchi with just about anything. I recently had pear Kimchi, which was actually really refreshing. I would say the most important things about making Kimchi are to salt, wash, and drain your cabbage well, have everything measured out and ready to use, and to really focus on making a flavorful paste to smother your cabbage with.

          I have been lucky enough to taste some incredible Kimchi in the past few years and have learned how to make a delicious, traditional Kimchi. This recipe can be modified to make either Pogi Kimchi (whole cabbage) or Gat Kimchi (cut-up cabbage). When I first learned about all the ingredients that go into Kimchi, I was amazed at such a combination. My wife’s mom makes the most incredible Kimchi, and learning what her secrets and procedures were really inspired me to start making more at home. I would like to put a disclaimer out there right now and say that I am not going to disclose exactly what goes into the broth for my mother-in-law’s Kimchi. However, a simple broth of vegetables and Dashima (also referred to as Kombu) works well for this and is what I will include in the recipe. As silly as this may sound, this is another one of those dishes in which you can really taste the love if you put in the time and effort. People typically spend all day making Kimchi and will sometimes make enough for months if not a full year. The recipe below is good for one head of Napa cabbage. As the weight of a cabbage does range, I’ll also say that the cabbage should weigh about three pounds.

Ingredients:

  • 1 head Napa cabbage
  • 1 Joseon radish
  • 2 bunches spring onions
  • 1 cup red pepper flakes
  • ½ cup anchovy fish sauce
  • ¼ cup salted shrimp
  • 3 tablespoons sugar
  • 1 onion
  • ½ head of garlic
  • 1 thumb of ginger
  • 1 jalapeño (optional)
  • ½ cup sweet rice
  • 3 cups seaweed and vegetable broth

Procedure:

  1. Cut cabbage into quarters and submerge in a brine of 1 part salt and 10 parts water.
  2. Leave in brine for 12 hours, then remove and wash thoroughly.
  3. Let the water drain from the salted cabbage for 2 hours in a colander.
  4. Take any trimmings from the cutting process and make a stock with that, 2 slices of Dashima, and 4 cups of water.
  5. Reduce the broth down to 3 cups, strain, and make sticky rice paste.
  6. Boil, then simmer rice until a paste and cool.
  7. In a food processor, blend the onion, garlic, ginger, and jalapeño, if using.
  8. Once blended into a paste, add to a mixing bowl and combine with salted shrimp, fish sauce, sugar, and red chili flakes to make the paste.
  9. Cut spring onions into 2-inch pieces.
  10. Julienne the Joseon radish after scrubbing the outside of it. Do not peel.
  11. Add radish and spring onion to the paste and prepare a workstation that can handle a potential mess.
  12. Between each layer of cabbage leaves, smear the paste and make sure to cover every part of the cabbage.
  13. Place these smothered cabbage quarters in a container and let sit out 1-3 days, depending on how sour you want your Kimchi.
  14. Your Kimchi is now ready to eat!

A few pointers for making Kimchi are that you want to let the radish and the paste sit together for about half an hour before using on your cabbage. Also, it’s important to recognize that Kimchi keeps fermenting in your fridge, so you don’t want it sitting out of the fridge for too long. For most beginners who have never tried Kimchi, I would recommend letting it sit out for 1 day and then refrigerating it to maintain a slow fermentation. I always love making this, and I hope this recipe gives people the ability to make some proper, delicious Kimchi. Thank you for reading and have a great week!
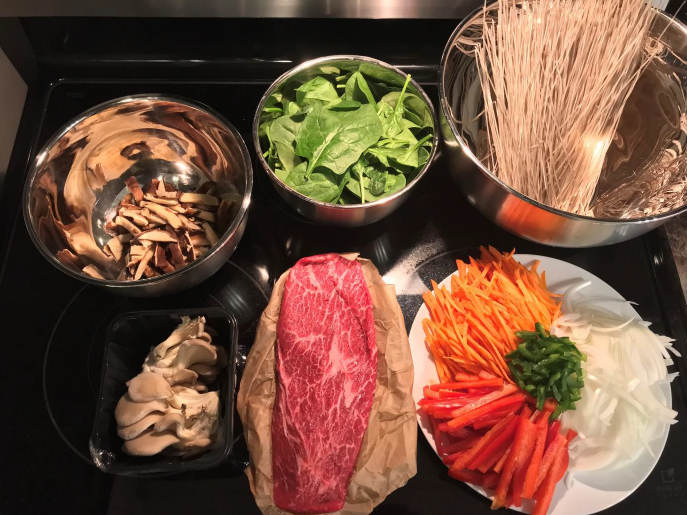

Cut the Cheese

Hey, everyone! The time has finally come for my cheese to be tasted! After two and a half months, I just couldn’t wait any longer. I knew that during the process of aging, my cheese formed a somewhat deep rind and dried out probably more than I had wanted it to. I amended this problem quickly enough to save the cheese from cracking though, and I’m really pleased with the result. While it is drier than I had seen in other results, it is still creamy for a semi-hard cheese. The color and texture are very much like gruyère and share a very similar flavor profile as well. If I could describe its flavor in three words, those words would be nutty, milky, and tangy. I think that with age, the tangy characteristic would turn into the mild sharpness that a comté or gruyère has. This was by far one of the most eagerly awaited things I’ve ever made. Hopefully, in the near future, I’ll be able to enjoy my blueberry wine with my tomme-style cheese!

Above is some footage of the cheese after I split it in two, then four. Looking back at all the photos I’ve taken during this process makes me feel lucky to have learned so much about this craft. I really appreciate the beautiful cheese press that Chef Slonaker made, and for inspiring me to really pursue this. After finally finishing this first cheese, I’m really hungry for more, and I hope to share more cheesemaking adventures on here. I really urge you all to try making that one thing you love to eat. Try learning how to do that thing you’ve always thought about doing. I’m someone who’s all too familiar with putting things like this off, but this was one of the most rewarding culinary experiences I’ve ever had. I’m very eager to start another project and to apply what I’ve learned from this run to the next. One of my favorite things in life is to learn something new, and I’m glad that I got to document and share my experience!


Under the weather? Get well soon with Grandma’s Chicken Soup.

Hey, everyone! I hope you’ve been keeping healthy during this season of head colds and stomach bugs. I personally came down with a head cold, and it was a nuisance to get over. Whenever I get sick, it feels like a wrench has been thrown into the multi-part machine that is my everyday life. My strategy is to get better as quickly as possible. Nothing is better than quality rest and lots of fluids, but I do have some home remedies that at least make me feel better. It’s these little things that help me get better as quickly as I can.

Growing up, there were many occasions during which Grandma’s matzah ball soup was eagerly awaited. Everyone in my family loves it, and my grandmother is always so kind as to make enough for everyone to take some home. To this day, this soup is what I look for when I’m feeling under the weather. There’s just something about properly done matzah ball chicken soup that revitalizes me and kicks the sickness right out. When my grandmother gave me her recipe, I hesitated at first to make it. I don’t mean to offend anyone whose matzah ball chicken soup I’ve had in my lifetime, but it has never held a candle to hers. I was worried that mine would never be able to measure up to the soup I remembered growing up. Recently, I changed my mind and figured I should start attempting to make it. Maybe in time, I can come close to the original!

One of the things that I love about this recipe is that it’s simple. Like many good things, time is the key to this soup’s success. Good preparation also makes this dish much easier to produce, which makes for an easier cleanup as well. The recipe for roughly six quarts of soup is below, and I really do recommend not trying to scale this down. If you have freezer space, you can make very large batches of this soup, which makes for fantastic eats throughout the year. Last, as you may notice in the recipe below, the chicken is roasted whole and then split in two. Again, I recommend using this technique, but, if necessary, pieces can be used as a substitute.

Ingredients:

1 whole chicken, fryer (2 ½ – 4 ½)

1 gallon cold water

4 celery hearts

1 large onion

2 parsnips, quartered

1 cup chicken broth

1 bunch dill

Preparation:

  1. Roast chicken with vegetables to lightly color chicken (15-20 minutes at 400°F).
  2. Cut chicken in half. (I use kitchen scissors.)
  3. Place remaining ingredients in small stock pot, bring to a boil, then simmer 2-3 hours covered.
  4. Once finished, remove meat at room temperature and pull chicken/remove bones.
  5. Add chicken back to soup and serve. (Season at the table!)

One of the reasons you should keep the chicken in halves, if not whole, is that this allows you to imbue so much flavor into the broth during its cooking process. It is also much more pleasant in the final dish if the meat is torn instead of diced or chopped. This soup is usually accompanied by light, fluffy matzah balls, which elevates this soup immensely. I feel as though this soup would also be great with rice or some type of noodle. This turned out to be very fun to make, and I’ve learned a lot about one of my favorite dishes. I feel lucky to have people in my life who can pass on such great things to me. I hope you’ve enjoyed this post, and, if you’re sick, get well soon!


Good Cheese and Fine Wine

Hey, everyone! This week, I wanted to do something similar to the last post. I am a huge believer that wine and cheese have this magical, soul-healing power when paired together. Maybe that’s just me! Anyway, this past summer, my friend Zach invited me over to his dad’s house to sort through and make jam out of farm-fresh blueberries. We had our work cut out for us, seeing as though it was over 20 pounds of blueberries. We gave it our best shot and ended up canning 24 jars of jam. However, there were still loads of blueberries left and not enough time in the day for jam. I was sent on my way home with 7 ½ pounds of blueberries, and the wheels in my head began to turn. Having made fruit wine before, I thought this would be a great idea for those super sweet, plump blueberries. I did a little research and talked to some people who had experience in making country and fruit wines to figure out the best approach for this. I wanted to gauge others to see what their ratios of fruit, sugar, water, and yeast were. After devising a plan, I got to work!

Just like with making cheese, winemaking calls for scrupulous sanitation. I use a solution called Star San to sanitize my equipment before I do anything like this. I washed all of my blueberries and then added six pounds of sugar into my five-gallon food-grade bucket. I then took a potato masher and created a syrupy mash by smashing the berries into the sugar. To this, I added 2 ½ gallons of boiling water and let it come to 98 degrees Fahrenheit. The next step was pitching the yeast, which requires water between 95 and 100 degrees Fahrenheit. I used a variety of wine yeast called “71B,” which is recommended for country and fruit wines. It’s as simple as letting one packet of yeast hydrate for a minute in your water and then stirring with a sanitized utensil. The packet of yeast that I bought ferments up to five gallons of must. Once that was done, I added the yeast to my must and stirred with a top-down motion. After a minute of stirring, I covered my must with cheesecloth, tied it with twine, and began my first fermentation. My work was complete until the following week, when I would have to strain my must into sanitized carboys.

While there are oftentimes just a few ingredients in the winemaking process, it is the actual process itself that can trip people up. Sanitation is really the biggest factor in this process, so I typically wash my tools and containers first and then sanitize with solution. Following this method, I cleaned all of my carboys, rubber bungs, air locks, and other items I used to get the wine from the bucket to the carboys. This process involved lining a sieve with cheesecloth, placing a funnel underneath the sieve, and pouring slowly into my carboys. As a side note, leaving headspace is very important when brewing wine. It would be an incredible waste to leave a half gallon’s worth of headspace in a gallon carboy and have your wine oxidize. I usually stick to about two or three inches from the rubber bung and airlock. Even though wine is partially protected from oxidization while brewing by a barrier of CO2, once you kill the yeast off, you run the risk of oxidizing your wine. There are ways to fix a headspace problem, but nothing is more surefire than using the right-sized container from the start.

The rest of the process is up to time and patience. It is important to monitor the development of the wine and make sure that your airlocks are properly filled and show signs of carbonation below. My wine is currently at its final stages of the brewing process, and I have added Potassium Metabisulphite to kill off any remaining yeast. This takes a few days to fully take effect, and it’s important to let the fermentation drastically slow, if not stop, before doing this. Without ensuring that the fermentation has finished, you could have re-fermentation occur after the bottling process. This leads to corks popping on their own and makes for a messy cellar! I hope that this post has inspired some of you to look into winemaking and viticulture. It is just incredible what fresh, juicy fruit and the right conditions can create. I actually had some left-over must from the winemaking process and decided to make my own blueberry vinegar using a small amount of “mother” from apple cider vinegar. The result was fantastic, and I will share pictures below along with my process for making the blueberry wine! Thanks for reading!


Make your own cheese at home!

Hey, everybody! This week, I wanted to try something new with the blog posts. Summer was very eventful in the kitchen for me, and I learned a lot about pastry as well as some other tasty things. One thing that I had been planning for a while was to go to a local dairy farm, buy some of their milk, and make myself a wheel of cheese! Thanks to the canning, jarring, and cheesemaking class that I took this past term, I had the confidence to invest the money in a cheese-making setup. I am an absolute cheese nut, so the thought of this was like a dream come true. I had recently asked Chef Slonaker if he would fashion me a cheese press so that I could make this happen, and he delivered something really beautiful and functional. I am very lucky to have this piece of equipment, and it will see many more presses to come. 

Even though I have some confidence in making cheese, I am very much an amateur. I wanted to find a recipe that wasn’t too daunting but still pushed the boundaries of what I had already done. New England Cheese Making Supply Company has many different recipes from beginner to advanced. They also sell a large selection of items ranging from cheese molds to cultures for making cheese. They turned out to be a great resource, and the recipe I chose was a tomme-style cheese. Tomme is an alpine-style cheese that was typically made when there was an excess of skim milk left over from skimming cream for butter or making other sorts of richer cheeses. This recipe called for thermophilic and mesophilic cultures as well as animal rennet and calcium chloride. The recipe seemed simple enough, but I wanted to attempt making a four-pound wheel.

I gathered my supplies, and, when I finally had the time, I drove out to a dairy in my area. Baily’s Dairy is a small family-run farm that offers beautifully sweet milk and an array of other dairy products. The family I met there was very kind, and the farm shop was fun to browse. One of the best things about sourcing your ingredients locally is getting to know the people putting in the effort to produce the ingredients you’re buying. I really look forward to going back for more milk and possibly some other goodies! Below you’ll see a short video that I have put together so that you can get a sense of what the process was like for me making the cheese. One of the best parts about something like this for me is that I can keep constantly improving and honing my craft. There are plenty of things that could have gone better, but I am thrilled with the result and had an amazing time making it. I have learned a lot from this adventure, and I am currently trying to decide what cheese to attempt next! This tomme-style cheese will age in my “cellar” for two to six months, then I’ll crack into it and post the result. Here’s the recipe for this cheese so that anyone who wants to make this at home can!


Japchae: A quick and easy side dish

Hey, everyone! This week, I really wanted to share a dish that is perfect for the summer. When it starts to get warm out, I find myself making all sorts of picnic foods to enjoy outside. I live right near Ridley Creek State Park, and whenever I have a free moment, I like to go for hikes and a quick picnic. The dishes I usually gravitate towards are ones that are especially tasty at room temperature. I like to have many options while eating, but, when I’m hiking, it isn’t always practical to bring loads of side dishes. One thing that I really like to do is make a dish that has many ingredients and can tide me over until I get back home. Stir-fries or ploughman’s lunches are always a great choice for outdoor eating. One recipe in particular that I really enjoy is called Japchae.

Japchae is a side dish from South Korea that is made up of sweet potato noodles, beef, a variety of mushrooms, and other vegetables. Especially during this time of year, when vegetables are flavorful and fresh, this dish really highlights each ingredient. I first came across this dish when I met my wife, Minju. I was amazed at how each flavor was preserved and the cooking procedure that went along with this. There is a very specific way to make Japchae, and each ingredient must be cooked separately according to its color and how long it takes to cook. This procedural cooking process, in my opinion, makes each flavor truly independent but in harmony with the others. Oftentimes, the flavor of a vegetable gets lost in the cooking process, but this does not seem to be the case with properly made Japchae.

The best Japchae I have ever had was at my wife’s family’s house in Seoul, South Korea. I was lucky enough to make a trip last August and experienced such an amazing and beautiful culture in person. I was amazed at how much care my jangmonim (mother-in-law) put into her cooking and how incredible her ingredients were. She served an enormous mixing bowl’s worth of Japchae that night, and it was accompanied by numerous side dishes and my jangin eoreun’s (father-in-law’s) homemade grape wine. I hope that you enjoy this recipe and that it shows just how versatile a handful of vegetables can really be!

Ingredients:
• 1 pound top round beef, sliced
• 1 tablespoon garlic, minced
• ¼ cup and 2 tablespoons soy sauce
• 1 tablespoon mirin
• 2 tablespoons sugar
• 1 large onion, julienne
• 1 cup oyster mushrooms, torn
• 1 cup fresh or rehydrated shiitake mushrooms, baton
• 2 tablespoons toasted sesame seed oil
• 350 grams dry sweet potato noodles
• 3 cups baby spinach
• 1 large carrot, julienne
• 1 red bell pepper, julienne
• 1 jalapeño pepper, ¼ moons
• Grapeseed oil or favorite high-heat cooking oil, as needed

Japchae ingredients

Procedure:
• Slice beef thinly and marinate first six ingredients for up to 24 hours. (Use only ½ the sugar and ¼ cup soy sauce for marinade.)
• Prepare vegetables and arrange so that they are separated and easily accessible.
• Set up a 12-inch sauté pan, a large mixing bowl, and a pot of boiling, salted water.
• Soak sweet potato noodles in cold water for 20 minutes.
• Blanch spinach, only so that it wilts and turns a vibrant, green color (15-30 seconds).
• Squeeze the liquid out of the spinach so that the color doesn’t run.
• At medium-high heat, cook beef, onions, garlic, and marinade in sauté pan.
• Once beef is cooked throughout, remove from pan.
• Remove remaining ingredients and sauce from pan once onions are tender.
• Add mushrooms to pan, along with enough oil to stir fry.
• Once mushrooms are cooked and pan is deglazed, remove from pan.
• Add carrots to pan with more oil, if needed.
• Remove carrots from pan once tender.
• Add red pepper to pan with more oil, if needed.
• After sweating the pepper, add the jalapeño, and cook until both are tender yet slightly crunchy.
• Combine ingredients in a large mixing bowl and hold.
• Transfer noodles to boiling water, and cook until tender but chewy.
• Rinse the noodles in cold water and drain.
• Add the noodles to the mixing bowl, and cut in half with scissors, if necessary.
• Add remaining sugar, toasted sesame seed oil, and soy sauce.
• With gloved hands, mix the sweet potato noodle stir-fry until combined.
• Serve immediately, or refrigerate and reheat.

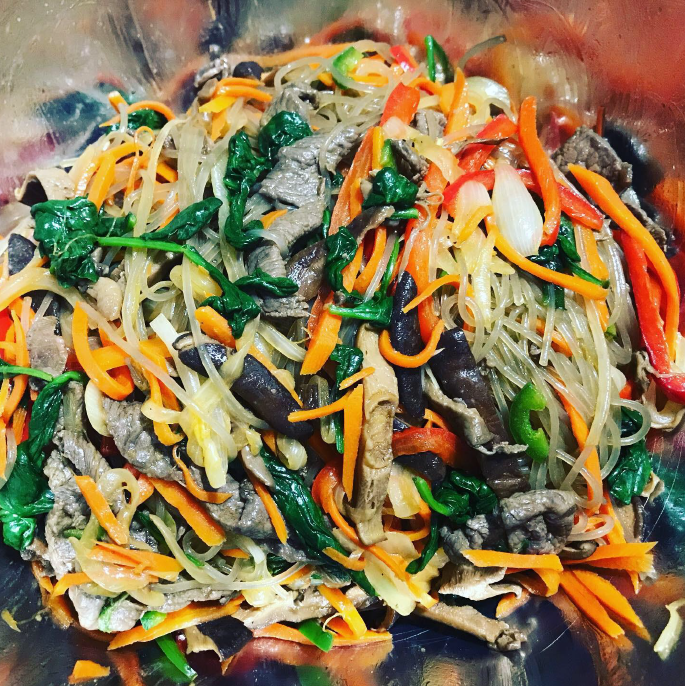
A delicious stir-fry dinner ready to eat!

Some important things to note for Japchae are that the vegetables should still be slightly crunchy. As with any stir-fry, you do not want mushy, overcooked vegetables. The contrast in textures and flavors in this dish is very satisfying and is partially what makes it so great. Another tip for good Japchae is not to overcook the beef, as it will get very chewy. Finally, good temperature control in your sauté pan is essential to the outcome of this dish. You do not want to brown or add color to the vegetables. This dish is meant to be vibrant and bursting with fresh, defined colors.

This stir-fry goes really well with most foods and can also be a great side dish. In Korea, it is customary to use the wood ear and shiitake mushrooms for this dish. Wood ear mushrooms are thin and wavy black mushrooms that have a distinct but mild flavor. You can buy them dried at most Asian supermarkets. Because of the fact that it is less accessible and more expensive than other mushroom types, I like to use torn oyster mushrooms instead of the wood ear. This recipe can easily be doubled or adjusted for how many people are eating, so I hope that you enjoy it on your own or try making it for a potluck!

-Steven Walsh, Walnut Hill College Student Leader

Read Steven’s bio


Celebrate Cinco de “May-o” with these delicious mayonnaise recipes!

By Steven Walsh

Hey, everyone! My name is Steven Walsh, and you’re currently reading the new WHC Food Blog. In this, I hope to show some of the recipes and techniques that I use at home and have used in professional settings. I, as well as lots of others here, love to cook and am passionate about food. Since starting at Walnut Hill College, I’ve wanted to create a forum and blog that allows people to communicate and share the things they love. As I learn more on my culinary journey, I aim to share what I like best with everyone reading. There are few things that I am not fond of, but there is nothing that I won’t try. I’m really excited to get this started, and I can’t wait to hear your thoughts and comments once this takes off. Thank you for reading and I hope you enjoy!

This week, I wanted to share two recipes that I use a lot at home. Despite my lack of pastry experience, this is partially a post about baking! To start though, I’ll be sharing a mayonnaise recipe that completely changed my mind about mayo.

Growing up, there were no ifs, ands, or buts, I hated mayonnaise. I didn’t like the concept, and I sure didn’t like the taste. Something seemed to be bitter or rancid every time I tried it, so I stopped trying it. As all of us do, I expanded my palate as I grew up and began to tolerate mayonnaise. It still wasn’t my preference, but it seemed like an alright substitute for butter on a sandwich. This opinion of mine would be completely flipped as I started to learn more about mayonnaise. As I began my education at WHC, I was given the task many times to make mayonnaise. Each time I made it, I liked it, but there was always that background rancid flavor. I had finally had enough and started to do some research on different oils and their properties. After playing around with different ideas, to make a long story short, I began to realize that the heat tolerance and neutral flavor of the oil was what had the biggest impact on the mayonnaise’s outcome. I wanted to test this, so I used my all-time favorite high-heat cooking oil, grapeseed oil.

“Whoa.” This was all I could think after what had just happened. It was a Saturday that I had off from work, and I was playing around in the kitchen as I often do. With the thoughts of grapeseed oil still fresh in my mind, I substituted the usual canola oil with it and made my mayonnaise. As a disclosure, I have tools at home that not everyone may have access to in a home kitchen. However, these recipes are adaptable, and I will always do my best to provide alternative methods. ????

Ingredients:

  • 1 ¼ cup grapeseed oil
  • 1 egg
  • ½ teaspoon salt
  • ½ teaspoon dry mustard powder (optional)
  • 1 tablespoon lemon juice

Procedure:

  • Add ¼ cup of grapeseed oil, egg, mustard powder, and salt into food processor.
  • Blend until smooth and pale (20-30 seconds).
  • Add remaining oil in a continuous, thin stream while still blending.
  • Once finished with the oil, add the lemon juice and blend only to combine.
  • Taste and adjust seasoning as preferred.
Make your own delicious homemade mayonnaise today!

I was instantly in love with this recipe. Food processor mayonnaise is a great way to save time and energy when making mayo. I actually like to use my whisk attachment on my stick blender to make this. I add the ingredients to a blender cup and use the electric whisk instead of a food processor. This recipe is really versatile, and I love using it for different things. I use it for cakes, dipping sauces, salad dressings, and more! One of my favorite mayonnaise recipes is my double chocolate mayo cake. I use small loaf tins for baking the cake and slice the cakes for dessert with some ice cream and fresh fruit!

Ingredients:

  • 1 cup grapeseed oil mayonnaise
  • 1 ½ teaspoon vanilla extract
  • ½ cup water
  • ½ cup whole milk
  • 1 cup sugar
  • 2 cups all-purpose flour
  • 4 tablespoons cocoa powder
  • 2 teaspoons baking powder
  • 1 teaspoon salt
  • 1 cup semi-sweet chocolate morsels (I use Ghirardelli)

Procedure:

  • Preheat oven to 350 degrees F.
  • Whisk together mayonnaise, vanilla, milk, and water.
  • Combine salt and sugar in a mixing bowl.
  • Sift flour, cocoa, and baking powder into dry ingredients.
  • Evenly mix with a dry, wooden spoon.
  • In three stages, incorporate your dry ingredients into your wet ingredients.
  • Fold in chocolate chips.
  • Oil 4 mini loaf tins with vegetable oil.
  • Cut strips of parchment paper long enough so that they hang out of the tins.
  • Evenly pour the batter into the tins and smooth for even baking.
  • Bake for 35 minutes or until a tester toothpick comes out clean.
  • Cool and serve.
Double Chocolate Mayo Cake

There are so many variations that can be made to both of these recipes, and I hope you get a chance to try them out. I would love to hear feedback, and pictures of cake and mayo are obviously welcome!

-Steven Walsh, Walnut Hill College Student Leader

Read Steven’s bio