5 Best Food and Gin Pairings to Enjoy This Valentine’s Day

By Heidi Jones

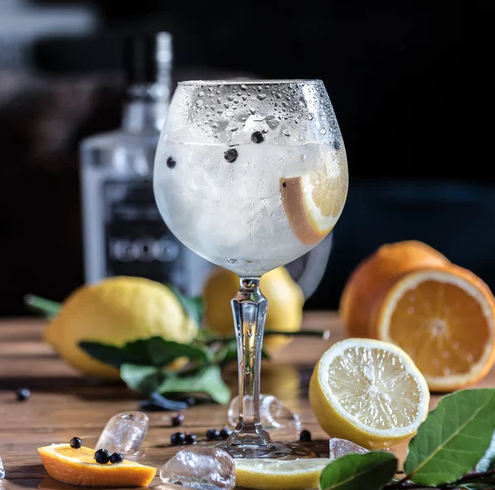
Valentine’s Day is just around the corner and you may be wondering what to do to bring a smile on your other half’s face. Why not go for a meal? A romantic one. Pairing food with liquor has been always one of the most celebrated activities to honor this day. Today, people are matching food and gin to achieve a perfect combination and this is slowly gaining popularity in many countries. People are finding ways through which they can enjoy their favorite gin and tonic drinks with their best meals. You should, however, know that there are skills needed for you to achieve a perfect match. Just like wine and food pairings, you need to know the taste profiles of both the food and drink you are about to pair. That is so that you don’t end up ruining the taste or making it too harsh to drink. For starters, below is a list of the best gin and food pairings that should help you have an idea of what the pairing process is all about. All you have to do is to figure out which other foods can pair well with gin.

Image Source

McQueen Sweet Citrus Gin with Smoked Salmon

There is no better gin and food pairing than McQueen citrus gin with smoked salmon. First, if you have a look at the taste profile of McQueen gin, from a glance, you will see citrus written all over it. The drink contains kaffir lime, grapefruit, and lemongrass. As expected, lemongrass dominates the drink’s taste and so be ready for a little bit of savory feel on the tongue. The sweetness of the gin pairs well with the lime taste to bring forth an incredible flavor. What better would it be to enjoy this pairing on your first date?

The idea that salmon tastes slightly different from other fish makes it a perfect candidate for this type of pairing. You should, however, focus more on the spices. To make an excellent match, make sure that the salmon is not too spiced. That is going to give you a hard time consuming the dish. Ensure you use few spices and salt it a little. That way, it will blend nicely with the McQueen sweet citrus gin. This pairing is definitely going to light up your partner’s mood.

Tandoori Scallops with Tanqueray

The taste profile of tandoori scallops depends on the spices you use. In most cases, you will find the dish having a spicy palate. That means coming up with a perfect pairing will give you a challenge, especially if you are a starter. But worry not, with patience you will be able to achieve an incredible match that will see people smack their lips. To build up the taste just enough to make it better and not unbearable, try pairing your tandoori scallops with a glass of Tanqueray. So sit back and relish on this amazing combination with your valentine.

It is among the ultimate gin and food pairings that go well together. That is because of the spicy flavor of tandoori scallops will complement the sharp lemon as well as the orange marmalade. The spices of both tandoori scallops and Sipsmith dry gin harmonious to achieve a great taste. You get to enjoy a spicy finish that will leave you completely refreshed. It is a pairing that anyone who loves spicy foods will adore.

Image Source

Crispy Chicken Wings with Plymouth Dry Gin

Everybody loves chicken wings, but not everybody can pair them with the right gin. Chicken wings that come with a crispy feel and some bit of spice are easy to pair. What you have to do is contrast the crispiness and the spicy flavor, and you will have yourself one of the best matches. Your number one choice when it comes to pairing chicken wings with gin should be Plymouth Dry Gin.

The drink comes with incredible notes, and pairs well with crispy chicken wings. At first, the gin is soft and incredible. You can then feel a buildup of cardamom, sweet orange, juniper, and lemon zest. It then finishes up with delicate citrus and mild earthy taste. Those are the things that make the two best gin and food pairing options. The sweet taste will contrast the spiciness of the fish, and the citrus will add a savory flavor from afar. No doubt, it is one of those experiences that a couple must give a shot.

Meatballs with Beefeater 24

Meatballs prepared with honey tends to have a sweet taste that leaves you yearning for more. One thing that you should be sure of is that the sweetness will mask the spices, and that is why pairing sometimes, is not as easy as it seems. But then, you can consider Beefeater 24 as the gin to use for this kind of pairing or something much more savory with a tinge of sweetness like beefeater 24.

The combination will see the tastes of licorice roots and citrus blend well with the sweetness of the meatballs. You thus end up getting a harmonious finish that is not only incredible but delectable. You can also pair it with Courvoisier to end up with a much better taste. In most cases, the best way to match a sweet dish is to pick something savory or bitter.

Image Source

Spiced Roast Beef with Monkey 47

Juicy and spicy roast beef is one of the best barbecues that you can ever ask for. The spices make it incredibly delicious, and smearing a bit of citrus juice can make it even much better. But then, how do you end up pairing such a dish without ruining the delectable flavor? The only way to avoid making the spice too intense for your palate is to contrast it with a gin like Monkey 47.

The gin comes with great flavors and floral notes. It features sweet licorice, cardamom, juicy lingonberry, and Jupiter. The sweetness of licorice is going to cut through the spices and balance them incredibly well. The citrus hint will then complement the citrus juice to make the taste much bearable. The combination ensures the flavors blend and unleashes a refreshing feel that is great for your tongue. What will impress you is how the meal will turn out to be impressive.

Image Source

These are some of the best pairings that you can achieve without fear of ruining the taste of the dish and the flavor of the gin. The combinations depend on two primary aspects, and that is they either complement each other or contrast each other to come up with a delightful feel and delectable finish. Whichever combination you make, make sure you analyze the flavor profiles of both the gin and the main dish so that you end up with an excellent match.

References

http://www.ginandtonicjuly.com/food.html

https://www.morningadvertiser.co.uk/Article/2016/05/17/How-to-pair-gin-with-food

https://www.lifestylefood.com.au/articles/ginstronomy-how-to-pair-gin-with-food.amp


Pita Bread Persistence

Hey, everyone! This week, I wanted to share something that I have been making quite a lot of recently. Ever since I was younger, I have absolutely loved pita bread. Whether it’s stuffed full of falafel or dipped in hummus, I can’t get enough. Ever since I stumbled upon a great recipe developed by Paul Hollywood, I’ve been making it all the time! I make quite a lot of hummus at home, and it’s fantastic to have a scratch-made lunch of pita, hummus, and salad. I think that working with this recipe has taught me a lot about proving dough and the process of making flatbread. I also learned a lot from a friend of mine here at school, who is incredible at making Mediterranean food. I’m still trying to perfect my pita, but I’ve had a ton of fun with the process of making it and learning how to get the perfect pocket.

I have tried a few different ways of making pita bread, but I have definitely found that the oven works best. When first making pitas in class, I tried making them on the back of a very hot cast iron pan. I would flip them halfway through, and the results were pretty decent. However, the pitas were never evenly colored, even though they had nice pockets. After doing some research, I found that my only other option really was an oven. A deck oven would definitely be the best choice for this, but sadly, I don’t have one of those at home. To simulate this, however, I cranked my oven up to 550 degrees Fahrenheit and preheated my baking trays to somewhat mimic the effect of heat from the top and bottom evenly. As this is essentially the same as heat cleaning your oven, please make sure that your oven is already clean if you’re going to try this. Greasy ovens at a high heat billow smoke and smell horrible. This proved to work very well but needs constant monitoring, seeing as though the pitas bake very quickly. That being said, I still achieved some good pockets and nice color!

This was another one of those projects that felt good to work on and get better at. I tried making a preferment for my dough to get some extra flavor out of it, and I really liked the way it turned out. I find that homemade food tastes better and is much more rewarding if you have the time and patience. I always have fun making recipes like this, because it becomes part of a hearty meal later on. For the sake of people who would like to try making this pita recipe, I have included it here. I hope this has inspired some of you to go out there and bake! I’ve definitely caught the bug and am looking forward to more fun bakes. Thank you for reading!


Aquafaba Adventures

Hey, everyone! This week, I wanted to focus on a recipe that would help me with minimizing my waste. This is something that I have been interested in for a while, as I’m always learning new ways to use things people usually consider “waste”. I recently learned a very interesting way to use the chickpea water in canned chickpeas. For the longest time, I discarded this and thought nothing of it. As it goes, aquafaba, or chickpea water, makes a fantastic meringue and, furthermore, great meringue cookies! My first attempt at this was without a recipe and did not turn out well at all. My second attempt, however, turned out great, based on a recipe I found online. I was shocked at the stability of this meringue and the fact that it was so silky and fluffy! This would make a fantastic icing or base for a vegan sponge. I was ecstatic after making this recipe, and I couldn’t wait for my meringues to finish baking.

I’d also had an idea for a plated dessert that I wanted to make for my wife. I had some peach butter that I had jarred over the summer and some raspberries in my fridge, so I went out, bought some coconut whipped cream, and made my version of a vegan pavlova. I was thrilled with the outcome and would absolutely make it again! This was such an incredibly cool experience for me, and I learned a lot about vegan baking. I love the fact that I can use part of a product I would usually throw away to make something delicious and beautiful. This could not have been a better experience for me, and I will absolutely be using this more and more in my cooking. I hope that you enjoyed this post. Thanks for reading!


Giving thanks and giving back with Walnut Hill College Student Leaders

Two Walnut Hill College Student Leaders, Joshua Reilly and Meg Linck, prepare a pre-Thanksgiving meal at the Clyde F. Barker Penn Transplant House, along with other members of the Student Leadership Development Institute. Photo credit: The Philadelphia Inquirer

On Tuesday, November 26, members of the Walnut Hill College Student Leadership Development Institute visited the Clyde F. Barker Penn Transplant House to prepare a pre-Thanksgiving dinner for residents of the transplant house and their families. This was the 7th meal in a partnership between the College and the Transplant House, all in an effort to engage WHC students with members and organizations of the University City community in a meaningful way.

The Philadelphia Inquirer wrote about this year’s Thanksgiving dinner, and we are happy to share their article, written by Mari A. Schaefer, both here and below:

Students at the Restaurant School at Walnut Hill College prepared a full Thanksgiving dinner with all the trimmings for patients and families who were staying at the Clyde F. Barker Penn Transplant House, where guests wait for or recover from an organ transplant.

The facility celebrated the holiday in the past with either a potluck or a catered meal, said Kirsten King, director of the 13-room guesthouse, located on 3940 Spruce St. In addition to doing all the cooking this year, the students sat with the guests to help celebrate, she said.

“They have been really enthusiastic collaborators,” said King. Residents of the Transplant House have been known to stay for as long as eight months during recovery, she said. So the homemade meal, which was funded with grants from Penn Medicine and the Transplant Institute, means a lot to them.

Added King, “We even asked them to make extra,” so that leftovers could be served on another night.

Video credit: Walnut Hill College Student Leader Steven Walsh

The Student Leadership Development Institute began a new partnership with the Clyde F. Barker Penn Transplant House on Spruce and 38th Streets about 14 months ago. If you are unfamiliar with the Clyde F. Barker Penn Transplant house, the house is not a medical facility, but rather a small guest house designed to meet the unique needs of transplant patients and their families during a trying time in which they wait for a transplant to be approved.

Initially, Dr. Julia G. Lavenberg, who is a Research Analyst for the Penn Medicine Center for Evidence-Based Practice, reached out to me, along with the Manager of the Transplant House, Kirsten King, with an opportunity of a potential long-term partnership involving what we do best: providing exceptional hospitality and food. The overall idea was for Walnut Hill College and, more specifically, the Student Leaders to plan, prep, and provide delicious meals for the patients, families, and friends residing at the Transplant House on a monthly basis. Needless to say, this was a fantastic opportunity for the college to partner with a nearby university in the community and, specifically, for our Student Leaders and the Student Leadership Development Institute to be at the center of the partnership…and we said yes.

Since the partnership began, these Student Leaders have planned, prepped, and provided seven different meals to the families and patients of the Clyde F. Barker Penn Transplant House, each meal with its own menu and its own theme. From garlic knots to focaccia, from Italian wedding soup to baked potato soup, and from snickerdoodles to berry pie, the patients, families, and friends of the Transplant House were treated to home-cooked meals and the incredible aromas that came with them.

Needless to say, I am extremely proud of this partnership and of our Student Leaders for delivering such an amazing experience to the guests of the Clyde F. Barker Penn Transplant House, and we are beyond excited in continuing this partnership for years to come!

Written by Dr. Joshua Seery, Director of the Walnut Hill College Student Leadership Development Institute


Thanksgiving at the Penn Transplant House

Hey, everyone! I hope that you’ve all had a good Thanksgiving. This week, I wanted to share something a little different from the usual content I post. On Tuesday, the 26th of November, a few of the Student Leaders and I went to the Clyde F. Barker Penn Transplant House to provide a meal for the people staying there. As a team, the Student Leaders organized and put on a dinner for the residents, and it turned out to be an incredible experience. We chose to do a Thanksgiving theme for our dinner and made roast turkey, mashed potatoes, roasted vegetables, apple and pumpkin pies, and other dishes to represent the holiday. There turned out to be loads of leftovers, but this made it so that people could pack lunches and dinners, if need be. It feels like a great opportunity to be able to provide a meal for people who are busy throughout the day caring for their loved ones.

On a separate note, I feel as though everyone should experience something like this in their lifetime. It’s important to put emotion into cooking and provide an experience for someone who needs a little extra love. One of the first things I can remember my grandmother saying to me about her food was that she had a secret ingredient. Every dish that she made for us would taste just that extra little bit delicious because of this one thing. Every time I asked why it was so good, my grandmother would tell me that she put all her love into what she had made. I became convinced that this really was the key to delicious food. Food should be full of love and care for those meant to enjoy it. I think that people should remember this when preparing and serving food to anyone. You might just make someone’s night because of what you’ve worked so hard to prepare.

Below, I have included a short montage of the Thanksgiving dinner put on by the Student Leaders. You can even read all about it here in the Philadelphia Inquirer! I hope that even though this post was different, you could all enjoy it in a different sort of way. Thank you for reading this and sharing the experience with me!


The Path to Paneer Perfection

Hey, everyone! This week, I was wondering what to do for a blog post, and a classmate of mine actually asked if I would make them some paneer. Paneer is a fresh cheese that comes from the Indian subcontinent. This quick and easy cheese has a number of uses and is delicious in many applications. This seemed like a good food to showcase, especially because I am a sucker for cheese! I went to a local market and picked out a gallon of whole milk for a two-pound yield of cheese. One of my all-time favorite dishes to eat that showcases paneer is Saag Paneer. A rich gravy of spinach and aromatics make up the sauce, and paneer soaks it right up, making for an irresistible combination. I really enjoy Indian cuisine, and over the years I’ve actually found that I like the vegetarian dishes better. In my opinion, paneer makes a fantastic substitute for meat and is easier on the stomach as well.

In my Canning, Jarring, and Preserving class here at WHC, I learned a great recipe for paneer that is very easy to execute. With only two ingredients, it is a procedural recipe that is very user-friendly. If you don’t quite get the separation of curds and whey the first time you add the lemon juice, you can always add more until you get the desired curds. Some important things to note are that when making any type of cheese, it is a good general rule to have cheese cloth or butter muslin on hand. A large sieve proves to be very helpful, as well as a half-sheet pan with a rack if you don’t have a proper cheese press. Something heavy such as a gallon of milk or heavy pans are good for pressing in a pinch. The following is the recipe I use from the class that I took. I think that it’s a good ratio and yield for milk to cheese. I really enjoyed making this recipe, and I hope that anyone reading does, too!

Ingredients:

  • 1 gallon whole milk
  • ½ cup lemon juice

Procedure:

  • Bring milk to a gentle, rolling boil.
  • Reduce heat to low, and stir in lemon juice.
  • Cook for 15 seconds, then remove from heat.
  • Stir gently to see separation (large curds), then leave for 10 minutes.
  • Ladle curds into strainer lined with cheese cloth.
  • Rinse curds gently with warm water to remove lemon juice.
  • Tie off cheese cloth, and hang for 1-2 hours to drain.
  • Place cloth-bound cheese on a sheet pan with a rack, and apply 5 lbs. of pressure for 1 hour. (A cheese press can be used as well.)
  • Remove cheese from cloth, and store for up to 2 weeks.

The beauty of a recipe like this is that you can easily change the batch size. The above recipe yields two pounds of paneer. Simply cut the recipe in half for a one-pound yield. Once you get the hang of making this, explore the many recipes that give paneer the showcase that it deserves. As previously mentioned, Saag Paneer is my favorite panir recipe, but there are most likely hundreds of recipes and variations to explore. Try substituting this in place of meat in a curry recipe. I’m sure the possibilities are endless, and I always have fun learning new ways to spice up ingredients that I love. I hope that you’ve enjoyed this post and that you now have a platform to follow your path to paneer perfection. Thanks for reading!


Kimchi for the Soul

Hey, everyone! This week, I really wanted to highlight one of my all-time favorite foods to make and eat. Since it’s Napa cabbage and Joseon radish season, it’s the perfect time to make some lovely Kimchi! Traditionally in Korea, a great harvest takes place during late fall, when a year’s worth of Kimchi is made. This event, called Kim-Jang, brings together an entire community for making hundreds and hundreds of heads of Kimchi. This is then shared by families and community members. Kimchi is a staple food in Korea, and what better way to use the harvest then to make lots of it! Nowadays, most people make Kimchi for their families and most people’s recipes and ratios differ from household to household.

          One of the reasons why I love Kimchi so much is that it’s incredibly versatile. It can be used as a side dish, a base for soups or stews, stir fried, boiled, and so on. When you get the hang of making Kimchi, you can start to experiment by adding other ingredients that you like that are fit to ferment. In some parts of Korea, you can find thinly sliced carrot in Kimchi as well as a certain type of seaweed. A handful of chefs and culinarians in Korea and around the world have taken it upon themselves to make Kimchi with just about anything. I recently had pear Kimchi, which was actually really refreshing. I would say the most important things about making Kimchi are to salt, wash, and drain your cabbage well, have everything measured out and ready to use, and to really focus on making a flavorful paste to smother your cabbage with.

          I have been lucky enough to taste some incredible Kimchi in the past few years and have learned how to make a delicious, traditional Kimchi. This recipe can be modified to make either Pogi Kimchi (whole cabbage) or Gat Kimchi (cut-up cabbage). When I first learned about all the ingredients that go into Kimchi, I was amazed at such a combination. My wife’s mom makes the most incredible Kimchi, and learning what her secrets and procedures were really inspired me to start making more at home. I would like to put a disclaimer out there right now and say that I am not going to disclose exactly what goes into the broth for my mother-in-law’s Kimchi. However, a simple broth of vegetables and Dashima (also referred to as Kombu) works well for this and is what I will include in the recipe. As silly as this may sound, this is another one of those dishes in which you can really taste the love if you put in the time and effort. People typically spend all day making Kimchi and will sometimes make enough for months if not a full year. The recipe below is good for one head of Napa cabbage. As the weight of a cabbage does range, I’ll also say that the cabbage should weigh about three pounds.

Ingredients:

  • 1 head Napa cabbage
  • 1 Joseon radish
  • 2 bunches spring onions
  • 1 cup red pepper flakes
  • ½ cup anchovy fish sauce
  • ¼ cup salted shrimp
  • 3 tablespoons sugar
  • 1 onion
  • ½ head of garlic
  • 1 thumb of ginger
  • 1 jalapeño (optional)
  • ½ cup sweet rice
  • 3 cups seaweed and vegetable broth

Procedure:

  1. Cut cabbage into quarters and submerge in a brine of 1 part salt and 10 parts water.
  2. Leave in brine for 12 hours, then remove and wash thoroughly.
  3. Let the water drain from the salted cabbage for 2 hours in a colander.
  4. Take any trimmings from the cutting process and make a stock with that, 2 slices of Dashima, and 4 cups of water.
  5. Reduce the broth down to 3 cups, strain, and make sticky rice paste.
  6. Boil, then simmer rice until a paste and cool.
  7. In a food processor, blend the onion, garlic, ginger, and jalapeño, if using.
  8. Once blended into a paste, add to a mixing bowl and combine with salted shrimp, fish sauce, sugar, and red chili flakes to make the paste.
  9. Cut spring onions into 2-inch pieces.
  10. Julienne the Joseon radish after scrubbing the outside of it. Do not peel.
  11. Add radish and spring onion to the paste and prepare a workstation that can handle a potential mess.
  12. Between each layer of cabbage leaves, smear the paste and make sure to cover every part of the cabbage.
  13. Place these smothered cabbage quarters in a container and let sit out 1-3 days, depending on how sour you want your Kimchi.
  14. Your Kimchi is now ready to eat!

A few pointers for making Kimchi are that you want to let the radish and the paste sit together for about half an hour before using on your cabbage. Also, it’s important to recognize that Kimchi keeps fermenting in your fridge, so you don’t want it sitting out of the fridge for too long. For most beginners who have never tried Kimchi, I would recommend letting it sit out for 1 day and then refrigerating it to maintain a slow fermentation. I always love making this, and I hope this recipe gives people the ability to make some proper, delicious Kimchi. Thank you for reading and have a great week!


Cut the Cheese

Hey, everyone! The time has finally come for my cheese to be tasted! After two and a half months, I just couldn’t wait any longer. I knew that during the process of aging, my cheese formed a somewhat deep rind and dried out probably more than I had wanted it to. I amended this problem quickly enough to save the cheese from cracking though, and I’m really pleased with the result. While it is drier than I had seen in other results, it is still creamy for a semi-hard cheese. The color and texture are very much like gruyère and share a very similar flavor profile as well. If I could describe its flavor in three words, those words would be nutty, milky, and tangy. I think that with age, the tangy characteristic would turn into the mild sharpness that a comté or gruyère has. This was by far one of the most eagerly awaited things I’ve ever made. Hopefully, in the near future, I’ll be able to enjoy my blueberry wine with my tomme-style cheese!

Above is some footage of the cheese after I split it in two, then four. Looking back at all the photos I’ve taken during this process makes me feel lucky to have learned so much about this craft. I really appreciate the beautiful cheese press that Chef Slonaker made, and for inspiring me to really pursue this. After finally finishing this first cheese, I’m really hungry for more, and I hope to share more cheesemaking adventures on here. I really urge you all to try making that one thing you love to eat. Try learning how to do that thing you’ve always thought about doing. I’m someone who’s all too familiar with putting things like this off, but this was one of the most rewarding culinary experiences I’ve ever had. I’m very eager to start another project and to apply what I’ve learned from this run to the next. One of my favorite things in life is to learn something new, and I’m glad that I got to document and share my experience!


Under the weather? Get well soon with Grandma’s Chicken Soup.

Hey, everyone! I hope you’ve been keeping healthy during this season of head colds and stomach bugs. I personally came down with a head cold, and it was a nuisance to get over. Whenever I get sick, it feels like a wrench has been thrown into the multi-part machine that is my everyday life. My strategy is to get better as quickly as possible. Nothing is better than quality rest and lots of fluids, but I do have some home remedies that at least make me feel better. It’s these little things that help me get better as quickly as I can.

Growing up, there were many occasions during which Grandma’s matzah ball soup was eagerly awaited. Everyone in my family loves it, and my grandmother is always so kind as to make enough for everyone to take some home. To this day, this soup is what I look for when I’m feeling under the weather. There’s just something about properly done matzah ball chicken soup that revitalizes me and kicks the sickness right out. When my grandmother gave me her recipe, I hesitated at first to make it. I don’t mean to offend anyone whose matzah ball chicken soup I’ve had in my lifetime, but it has never held a candle to hers. I was worried that mine would never be able to measure up to the soup I remembered growing up. Recently, I changed my mind and figured I should start attempting to make it. Maybe in time, I can come close to the original!

One of the things that I love about this recipe is that it’s simple. Like many good things, time is the key to this soup’s success. Good preparation also makes this dish much easier to produce, which makes for an easier cleanup as well. The recipe for roughly six quarts of soup is below, and I really do recommend not trying to scale this down. If you have freezer space, you can make very large batches of this soup, which makes for fantastic eats throughout the year. Last, as you may notice in the recipe below, the chicken is roasted whole and then split in two. Again, I recommend using this technique, but, if necessary, pieces can be used as a substitute.

Ingredients:

1 whole chicken, fryer (2 ½ – 4 ½)

1 gallon cold water

4 celery hearts

1 large onion

2 parsnips, quartered

1 cup chicken broth

1 bunch dill

Preparation:

  1. Roast chicken with vegetables to lightly color chicken (15-20 minutes at 400°F).
  2. Cut chicken in half. (I use kitchen scissors.)
  3. Place remaining ingredients in small stock pot, bring to a boil, then simmer 2-3 hours covered.
  4. Once finished, remove meat at room temperature and pull chicken/remove bones.
  5. Add chicken back to soup and serve. (Season at the table!)

One of the reasons you should keep the chicken in halves, if not whole, is that this allows you to imbue so much flavor into the broth during its cooking process. It is also much more pleasant in the final dish if the meat is torn instead of diced or chopped. This soup is usually accompanied by light, fluffy matzah balls, which elevates this soup immensely. I feel as though this soup would also be great with rice or some type of noodle. This turned out to be very fun to make, and I’ve learned a lot about one of my favorite dishes. I feel lucky to have people in my life who can pass on such great things to me. I hope you’ve enjoyed this post, and, if you’re sick, get well soon!


Good Cheese and Fine Wine

Hey, everyone! This week, I wanted to do something similar to the last post. I am a huge believer that wine and cheese have this magical, soul-healing power when paired together. Maybe that’s just me! Anyway, this past summer, my friend Zach invited me over to his dad’s house to sort through and make jam out of farm-fresh blueberries. We had our work cut out for us, seeing as though it was over 20 pounds of blueberries. We gave it our best shot and ended up canning 24 jars of jam. However, there were still loads of blueberries left and not enough time in the day for jam. I was sent on my way home with 7 ½ pounds of blueberries, and the wheels in my head began to turn. Having made fruit wine before, I thought this would be a great idea for those super sweet, plump blueberries. I did a little research and talked to some people who had experience in making country and fruit wines to figure out the best approach for this. I wanted to gauge others to see what their ratios of fruit, sugar, water, and yeast were. After devising a plan, I got to work!

Just like with making cheese, winemaking calls for scrupulous sanitation. I use a solution called Star San to sanitize my equipment before I do anything like this. I washed all of my blueberries and then added six pounds of sugar into my five-gallon food-grade bucket. I then took a potato masher and created a syrupy mash by smashing the berries into the sugar. To this, I added 2 ½ gallons of boiling water and let it come to 98 degrees Fahrenheit. The next step was pitching the yeast, which requires water between 95 and 100 degrees Fahrenheit. I used a variety of wine yeast called “71B,” which is recommended for country and fruit wines. It’s as simple as letting one packet of yeast hydrate for a minute in your water and then stirring with a sanitized utensil. The packet of yeast that I bought ferments up to five gallons of must. Once that was done, I added the yeast to my must and stirred with a top-down motion. After a minute of stirring, I covered my must with cheesecloth, tied it with twine, and began my first fermentation. My work was complete until the following week, when I would have to strain my must into sanitized carboys.

While there are oftentimes just a few ingredients in the winemaking process, it is the actual process itself that can trip people up. Sanitation is really the biggest factor in this process, so I typically wash my tools and containers first and then sanitize with solution. Following this method, I cleaned all of my carboys, rubber bungs, air locks, and other items I used to get the wine from the bucket to the carboys. This process involved lining a sieve with cheesecloth, placing a funnel underneath the sieve, and pouring slowly into my carboys. As a side note, leaving headspace is very important when brewing wine. It would be an incredible waste to leave a half gallon’s worth of headspace in a gallon carboy and have your wine oxidize. I usually stick to about two or three inches from the rubber bung and airlock. Even though wine is partially protected from oxidization while brewing by a barrier of CO2, once you kill the yeast off, you run the risk of oxidizing your wine. There are ways to fix a headspace problem, but nothing is more surefire than using the right-sized container from the start.

The rest of the process is up to time and patience. It is important to monitor the development of the wine and make sure that your airlocks are properly filled and show signs of carbonation below. My wine is currently at its final stages of the brewing process, and I have added Potassium Metabisulphite to kill off any remaining yeast. This takes a few days to fully take effect, and it’s important to let the fermentation drastically slow, if not stop, before doing this. Without ensuring that the fermentation has finished, you could have re-fermentation occur after the bottling process. This leads to corks popping on their own and makes for a messy cellar! I hope that this post has inspired some of you to look into winemaking and viticulture. It is just incredible what fresh, juicy fruit and the right conditions can create. I actually had some left-over must from the winemaking process and decided to make my own blueberry vinegar using a small amount of “mother” from apple cider vinegar. The result was fantastic, and I will share pictures below along with my process for making the blueberry wine! Thanks for reading!